While playing with my Raspberry PI, I looked at different networking options available – Ethernet is great, if your house is already cabled, Wi-Fi is great if it isn’t (but on the other hand, not all adapters work reliably and they pull a lot of power, and generate a bit of heat).
How great would it be if you could simply attach a bluetooth adapter and be able to pull up a serial console? Turns out it’s pretty easy to do.
Step one - get a bluetooth dongle and plug it in
I’ve picked up a cheapo module for $1.95 a piece. They are all mostly the same thing.
Step two - install bluez for Linux and configure your adapter
Packages are readily available for nearly all distributions.
$ sudo apt-get install bluez
Reading package lists... Done
Building dependency tree
Reading state information... Done
The following NEW packages will be installed:
  bluez
0 upgraded, 1 newly installed, 0 to remove and 107 not upgraded.
Need to get 0 B/895 kB of archives.
After this operation, 2075 kB of additional disk space will be used.
Selecting previously unselected package bluez.
(Reading database ... 73325 files and directories currently installed.)
Unpacking bluez (from .../bluez_4.99-2_armhf.deb) ...
Processing triggers for man-db ...
Setting up bluez (4.99-2) ...
Reloading system message bus config...done.
Starting bluetooth: bluetoothd rfcomm.
Your bluetooth device should be up and running now. To verify that the adapter was recognized by the kernel and is operational, do the following:
$ hciconfig
hci0:   Type: BR/EDR  Bus: USB
        BD Address: 00:11:67:00:00:00  ACL MTU: 510:8  SCO MTU: 48:10
        UP RUNNING PSCAN
        RX bytes:27177 acl:504 sco:0 events:1654 errors:0
        TX bytes:56051 acl:1309 sco:0 commands:194 errors:0
Now, let’s make it discoverable and pair it with our device. First, we’ll need to tell the adapter to put itself in discoverable mode, then we need to fire up the agent, which will respond to pairing requests. Your device should become visible, and should be paired with one click of a button.
$ sudo hciconfig hci0 piscan
$ sudo bluetooth-agent 1234
Confirmation request of 577270 for device /org/bluez/2055/hci0/dev_00_26_B0_F1_99_97
Once we’re done with this step, we can hit Ctrl-C and not worry about bluetooth-agent until we want to pair the next device.
Step three - configure the serial port emulation service and attach getty to it
We’ll be communicating over the RFCOMM protocol, which provides roughly the same functionality as TCP, and just like TCP uses ports as virtual channels, except in this case, there are only 30 of them. Because the remote device doesn’t know anything about what port (channel) we’ve decided to bind the serial port service to, we’ll need to let them know.
$ sdptool add --channel=3 SP
Serial Port service registered
$ sdptool browse local
(...)
Service Name: Serial Port
Service Description: COM Port
Service Provider: BlueZ
Service RecHandle: 0x10006
Service Class ID List:
  "Serial Port" (0x1101)
Protocol Descriptor List:
  "L2CAP" (0x0100)
  "RFCOMM" (0x0003)
    Channel: 3
Language Base Attr List:
  code_ISO639: 0x656e
  encoding:    0x6a
  base_offset: 0x100
Profile Descriptor List:
  "Serial Port" (0x1101)
    Version: 0x0100
Now, for the slightly trickier bit. We’ll need to bind channel 3 to whatever service we wish to run on it. In our case, we want to run getty which in turn lets us log in and interact with our Raspberry Pi.
$ sudo rfcomm watch /dev/rfcomm0 3 /sbin/agetty rfcomm0 linux 115200
Waiting for connection on channel 3
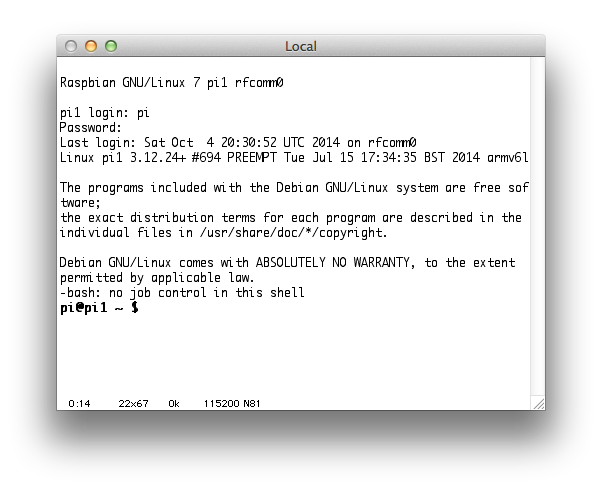
This will make the adapter listen for incoming connections on channel 3, and once a connection is accepted - a new getty session will be launched on the device rfcomm0, permitting us to log in via a terminal program running on the connected client.
When a connection is made, you should see the following:
$ sudo rfcomm watch /dev/rfcomm0 3 /sbin/agetty rfcomm0 linux 115200
Waiting for connection on channel 3
Connection from 00:26:B0:F6:90:97 to /dev/rfcomm0
Press CTRL-C for hangup
Caveats
Sadly, this approach is not without shortcomings. For starters, you’ll notice that your rfcomm connection is hogging the CPU:
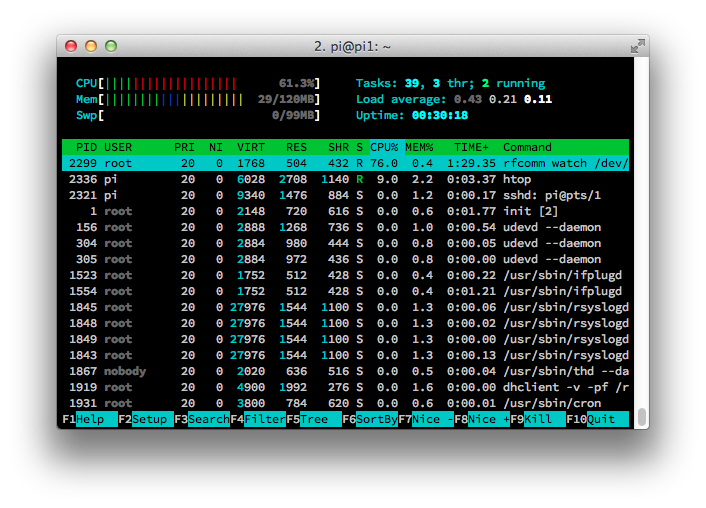
I’ve been able to trace this to repeated calls to ppoll(), but have not dug any further yet.
